How to Perform Orbi Satellite Firmware Update Manually?
The Orbi mesh WiFi system won’t work well if the firmware of your router is not compatible with the firmware version of your satellite. Therefore, it is recommended that you perform Orbi satellite firmware update as well as the Orbi router firmware update. In this blog, you will find instructions to load the latest firmware version on the satellite manually.
Steps to Update Orbi Satellite Firmware
It is recommended that you update the satellite firmware before the router. Although you can update the firmware by checking the version, it is advised that you carry out the process manually. Here are the steps that you need to follow in order to complete Orbi satellite firmware update. Know that the steps will remain the same no matter whether you have done Orbi WiFi extender setup or your satellite is running in the Orbi mode.
1. Download the Firmware File First
- Go to Netgear Download Center and download the firmware version for your satellite.
- The firmware version is supposed to be compatible with the satellite model you are using.
- Save the file at the most convenient location.
- You might need to unzip the firmware update file.
2. Access the Firmware Update Tab
- Load a web browser on a computer that is connected to the Orbi WiFi and go to orbilogin.com.
- This will take you to a login window where you have to enter the login username as admin.
- Use the password that you specified during the Orbi setup process.
- Know that login details are case-sensitive. Thus, enter them carefully.
- You will be taken to the BASIC Home page or the STATUS page of the Orbi satellite.
- Now, select Administration followed by Advanced.
- Click Firmware Update to reach the Firmware page of the Orbi mesh system.
Upload the Orbi Satellite Firmware Update File
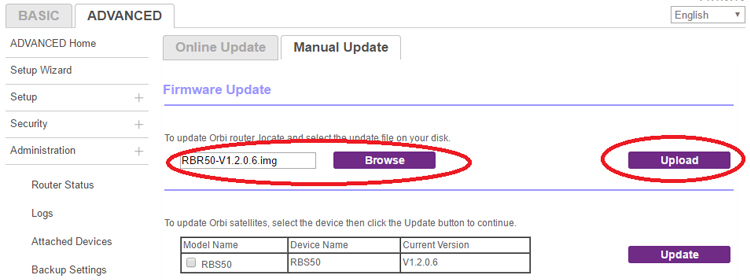
- Now, you need to click Manual Update in order to update the satellite firmware manually.
- You have to select the check box next to the model number of your Orbi satellite.
- In case, you own more than 1 satellite, consider updating one satellite at a time. Begin the firmware update for second satellite only after the completion of the firmware update of the first satellite.
- Select Update.
- You will get redirected to the Orbi Satellite Firmware Update window.
- In case, the browser prompts you to enter the admin password, use the same value that you used to log in to your Orbi satellite.
- Click the Browse button now.
- Now, find the firmware update file that you downloaded in the first step. It might end with .img or .chk extension.
- Select the file and click the Upload option.
- The firmware update will begin.
- It might take a few minutes to complete this process.
In this manner, you can update the Orbi satellite firmware. As soon as the process finishes, you are suggested to select Status and verify the firmware version on the STATUS page or the BASIC Home screen. If it is the one that you uploaded, the firmware update is successful.
Tips for Successful Orbi Firmware Update
Do not power down the satellite during the firmware update process and ensure that the firmware file you upload belongs to the satellite model you own only. Uploading the incorrect firmware file can result in a non-functional satellite. Apart from this, avoid updating two satellites simultaneously.
The Conclusion
The Orbi satellite firmware update is an important process that needs to be completed in every scenario. You need to update the satellite no matter it is operating in the Orbi mode or the Router mode. Now, we are hopeful that using the information given in this blog, you will be able to upload the latest firmware version on the satellite without any hassle.
